The Core Principles
I’m not going to dive into the history of this phenomenon; tons of text have been written about it online. Instead, we’ll jump straight into the practice of creating simple applications. I’ll explain what’s achievable for someone completely new to IT and programming, and where this approach might not be the right tool, leaving you only with frustration.
1. Anyone can do it (with the right gear).

Can a stay-at-home parent or even a kid create a simple application? The answer is a definite yes! What do you need?
First, let’s talk about your computer. You don’t need a high-end gaming rig or an expensive powerhouse. Any modern laptop or desktop from the last 5-7 years that can browse the web without lag is perfectly fine. For a smooth, frustration-free experience, the key is to have at least 8GB of RAM and preferably a Solid State Drive (SSD) instead of an old hard drive.
Just as important are your peripherals. A good keyboard and mouse, or a reliable touchpad, are essential. Why? Because you might be interacting a lot with an AI, writing detailed prompts. A sticky key or a lagging mouse will just waste your time and fray your precious nerves.
2. Know your goal (and forget the middle).
You must clearly understand what you want to create. You need to know what you’re providing as input and fully understand what you want to get as an output. The AI will act as a “black box” for you. There’s an input and an output, but you don’t need to be concerned with what happens in between. For simple tasks, you don’t need to understand the complex code the AI generates.
3. Your toolkit is simple and free.
What are the tools? I won’t suggest paid visual editors; the quality ones all cost money. I advise you to get the free but powerful Notepad++. This will be more than enough for creating your first programs.
For the AI assistant, you can use the Copilot built into Windows. You can also follow this lesson using any of the many modern AIs online, but remember that some free versions have limits. A good exception is Grok, which can be very generous. For this tutorial, however, I will build the entire application together with Gemini.
Let’s Build Our First App: A Calorie Calculator
Okay, enough talk. Let’s build something real! We’re going to create a simple, useful web app that calculates your daily calorie needs. This is the perfect first project.
To start, you need to see how a conversation with an AI works. Here’s the simple prompt I used to generate the project plan and the code below.
My Prompt to Gemini: “Hey! I’m creating a tutorial for absolute beginners (‘vibe coders’). Can you help me build a simple daily calorie calculator web app?
It needs to take these user inputs:
- Age
- Gender
- Weight (in kg)
- Height (in cm)
- Activity level
Then, it should calculate and display the result. Please provide the complete code in three separate files:
index.html,style.css, andscript.js. Keep the code clean and add simple English comments for beginners.”
The AI understood the task, the target audience, and the technical requirements, and then provided the code. Now, let’s build it
Lesson 0: Setting Up Your Workspace
Before we write code, let’s get organized.
Step 1: Create Your Project Folder 📂
Every project needs a home.
- Go to your Desktop.
- Create a new folder and name it
calorie-calculator.
Step 2: Create Your Project Files
Now, open Notepad++ and we will create three empty files inside that folder.
- The Blueprint (
index.html): This file will hold the structure of our app. Create a new file, paste the HTML code below, and save it asindex.htmlinside your folder. Remember to set “Save as type” to “All Types (*.*)”. - The Design Rules (
style.css): This file will hold the colors and layout. Create a new file, paste the CSS code below, and save it asstyle.cssin the same folder. - The Brain (
script.js): This file will make our calculator actually work. Create a final new file, paste the JavaScript code below, and save it asscript.js.
You should now have a folder with three files: index.html, style.css, and script.js
The Code: Assembling Our App
Here is the code for each of the three files.
1. The HTML Blueprint (index.html)
This is the skeleton of our app. It defines all the input fields, buttons, and text areas.
<!DOCTYPE html>
<html lang="en">
<head>
    <meta charset="UTF-8">
    <meta name="viewport" content="width=device-width, initial-scale=1.0">
    <title>Calorie Calculator</title>
    <link rel="stylesheet" href="style.css"> </head>
<body>
    <div class="calculator">
        <h1>Daily Calorie Calculator</h1>

        <p>Age:</p>
        <input id="age" type="number" placeholder="e.g., 25">

        <p>Gender:</p>
        <input type="radio" name="gender" value="male" checked> Male
        <input type="radio" name="gender" value="female"> Female

        <p>Weight (kg):</p>
        <input id="weight" type="number" placeholder="e.g., 70">

        <p>Height (cm):</p>
        <input id="height" type="number" placeholder="e.g., 180">

        <p>Activity Level:</p>
        <select id="activity">
            <option value="1.2">Sedentary (little exercise)</option>
            <option value="1.375">Lightly active (1-3 days/week)</option>
            <option value="1.55">Moderately active (3-5 days/week)</option>
            <option value="1.725">Very active (6-7 days a week)</option>
        </select>

        <button id="submit">Calculate</button>

        <h2 id="result-container">Your daily need: <span id="result">0</span> kcal</h2>
    </div>

    <script src="script.js"></script> </body>
</html>
2. The CSS Styling (style.css)
This code makes our calculator look clean and modern instead of like a boring document.
/* This makes the page look nice */
body {
  font-family: Arial, sans-serif;
  background-color: #f4f7f6;
  display: flex;
  justify-content: center;
  align-items: center;
  height: 100vh;
  margin: 0;
}

/* This is the main container for our calculator */
.calculator {
  background-color: white;
  padding: 25px 30px;
  border-radius: 10px;
  box-shadow: 0 4px 10px rgba(0,0,0,0.1); /* Adds a subtle shadow */
  width: 320px;
}

/* Style for the input fields and dropdown */
input[type="number"], select {
  width: 100%;
  padding: 8px;
  margin-top: 4px;
  border-radius: 4px;
  border: 1px solid #ddd;
  box-sizing: border-box;
}

/* Style for the main button */
button {
  width: 100%;
  padding: 12px;
  margin-top: 20px;
  background-color: #5c67f2;
  color: white;
  border: none;
  border-radius: 5px;
  cursor: pointer; /* Shows a clickable hand icon on hover */
  font-size: 16px;
}

button:hover {
  background-color: #4a54c4;
}
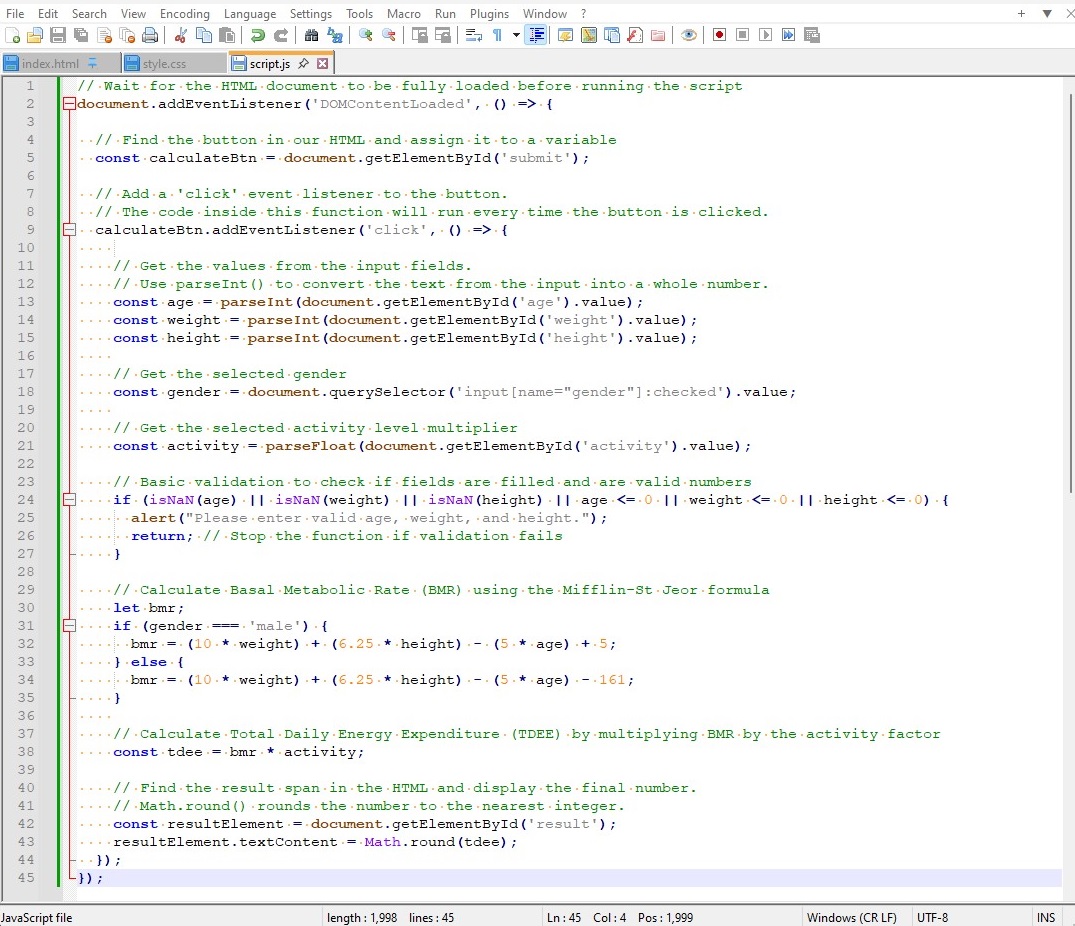
3. The JavaScript Brain (script.js)
This is the magic. This code listens for the button click, grabs the user’s data, does the math, and displays the final result.
// Wait for the HTML to be loaded before running the script
document.addEventListener('DOMContentLoaded', () => {

  // Find the button in our HTML
  const calculateBtn = document.getElementById('submit');

  // This function will run every time the button is clicked
  calculateBtn.addEventListener('click', () => {

    // Get the values from the input fields
    const age = parseInt(document.getElementById('age').value);
    const weight = parseInt(document.getElementById('weight').value);
    const height = parseInt(document.getElementById('height').value);
    const gender = document.querySelector('input[name="gender"]:checked').value;

    // Check if fields are filled
    if (isNaN(age) || isNaN(weight) || isNaN(height)) {
      alert("Please enter a valid age, weight, and height.");
      return;
    }

    // Calculate Basal Metabolic Rate (BMR)
    let bmr;
    if (gender === 'male') {
      bmr = (10 * weight) + (6.25 * height) - (5 * age) + 5;
    } else {
      bmr = (10 * weight) + (6.25 * height) - (5 * age) - 161;
    }

    // Get the activity level and calculate the final calorie need (TDEE)
    const activity = parseFloat(document.getElementById('activity').value);
    const tdee = bmr * activity;

    // Display the final result
    const resultElement = document.getElementById('result');
    resultElement.textContent = Math.round(tdee);
  });
});
You Did It!
Now, go to your calorie-calculator folder and double-click the index.html file. It will open in your browser.
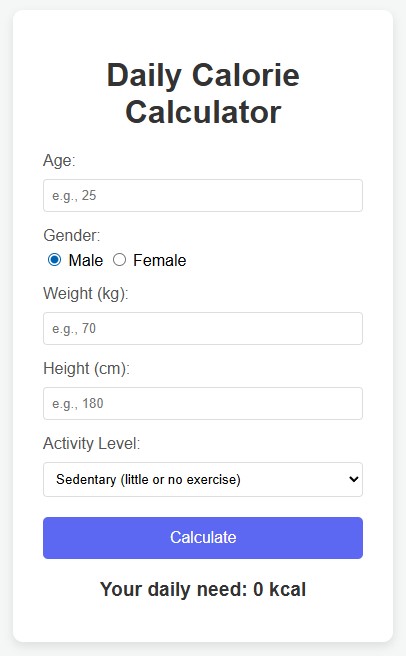
You’ve just built your first web application! Play around with it, and even try asking your AI to help you change the colors or button text. Welcome to vibe coding.
What’s Next? Get Ready for Level 2!
You’ve built an amazing foundation, but this is just the beginning.
In our next lesson, we’re going to seriously upgrade our app. We will add a new feature that lets you enter any food product, and our calculator will automatically analyze it for you.
How is this possible? We will learn how to connect our simple application to a powerful AI API. This will give our calculator a real brain, capable of understanding and processing information about thousands of foods.
Stay tuned for the next lesson, where we’ll bring a true AI assistant into our project!
➡️ Continue to Lesson 2: Level Up with an AI Co-Pilot
Follow the Vibe


Leave a Reply